Baba Nyonya Peranakans informs readers with the History, Culture, Food, and authentic Recipes of this Southeast Asian culture of Malaysia and Singapore.
I was recently interviewed by Universiti Malaya on the state of the Baba Nyonya Peranakan culture, and I shared my thoughts on its current state, the challenges, and what it could take to revive the culture.
I don’t claim to be an expert on the culture, but I shared my thoughts from years of research and writing about it.
Please watch this 2-part interview and feel free to discuss what was said. Kamsiah.
With the coming of the Lunar New Year, this Chinese sweet and fragrant pork jerky is a-must in most homes, whether traditional Chinese or Peranakan.
I recall following my Cantonese maternal grandmother (married into a Peranakan family) to Chinatown as we fought the crowds and vendors who suffocated the narrow streets with their merchandise, barely allowing room for anything else to pass through let alone any car. But the grill fumes from preparing this meat treat was always a welcome sight as the fragrant smoke wafted in the air to tempt the passerby. Invariably, my grandmother would stop at her favorite stall to purchase a few pieces for her grandchildren whom she adored.
Having left Malaysia for further studies, it was difficult to find long yok in the United Kingdom, and impossibly so when I moved to USA. But nostalgia is the mother of culinary invention. A few years ago, I started to notice recipes popping up on the internet. I gave them a try but I was not quite satisfied with their rendition. With some experimenting and tweaks, here is my version that is as close as I remember the flavors that I grew up as a child.
The recipe is very simple to make. However, the secret ingredient that I do not see in other versions is the use of Chinese licorice powder which is best grounded from slices of the dried stems. I am quite sure this will be hit with your loved ones as it is with my folks.
Printable Copy (link) – Recipe from Edible Memories e-cookbook
½ teaspoon Chinese licorice powder (ground and sieved from dried stems)
½ teaspoon cinnamonpowder
1½ tablespoons fish sauce
1½ tablespoons thin soy sauce
1 tablespoon oil
2 tablespoons Xiaoxing rice wine, preferably Rose wine
2 tablespoons dark soy sauce
3 to 4 drops of red food coloring
Step1: Mix the ground pork with the marinade. Leave it in the fridge overnight or at least 4 hours.
Step 2: Turn oven on to 250F/ 120C. Oil or line a large baking sheet with parchment or baking paper. Put the marinated pork on the baking sheet and spread the meat as thinly as possible to cover the whole sheet – use another baking sheet if there is extra meat. Bake on the middle rack for 20 minutes or until firm to the touch.
Step 3: Turn the oven up to 350F/ 175C. Bake for 20 to 30 minutes until pieces are sticky and quite dry.
Step 4: Remove from the oven. Using a knife or a pizza cutter, cut the meat into fairly large squares. Allow to cool.
Step 5: Grill pieces in an outdoor grill or place them under the broiler until they are slightly caramelized with slight charring. Wrap in wax paper or foil and freeze until needed.
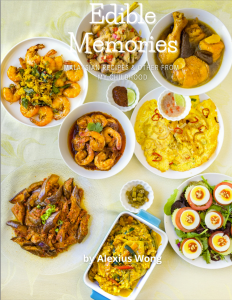
The hardcopy and e-book of The Baba Nyonya Peranakans book (1st image) and Edible Memories e-cookbook (2nd image) are available – more information on the Homepage.
Throughout my years of researching and writing Nyonya recipes, this cookie has been extremely elusive and the most difficult for many reasons. My grandmothers never made these cookies when I was young, contrary to what many think of the superwoman Nyonya cook – I only recall them coming home with plastic containers filled with these bright white morsels and tasking the grandchildren to place red dots with toothpicks dipped in red dye. However, my father recalls seeing his mother make it during his youth with a covered kuali/wok over woodfire. Furthermore, I came across recipes that either were not successful or required sago flour that is impossible to find outside of Malaysia. So, in a way, I was either afraid of trying again or I had just thrown in the towel, literally!
However, my love for these sweet treats did not diminish with time, and my recollections of them were always the fondest and warmest memories of my grandmothers whipping up a culinary storm in the weeks of preparation for the Lunar New Year. Recently, I came across some recipes in Nyonya food groups on Facebook, and I noticed that the cookies were made with only tapioca flour which is easily available – this stirred up my curiosity and interest in it again. Besides, the beautiful wooden cookie moulds given by my sister years ago were gathering dust and beckoning me to give it another try. So I printed out a few versions and I studied them before I made a couple of batches. Below is my version of it.
Making Kueh Bangkit is deceptively tricky. The baking or frying of the flour with pandan leaves is to infuse it with the leaves’ aroma as well as to dry the flour out to produce a mouth-melting product. The use of the egg yolk with hardly any egg white attached is to avoid the stiffening protein from the white, and it is beaten with the sugar to lighten its yellow color – get store-bought and not farm eggs so that the dough will stay quite white. The dough has to be formed with just the right amount of coconut cream, not the milk, so that it is not only rich in flavor, but the cookie is flaky and soft due to the lack of excess water. The baking has to be at the right temperature and timing so that it is cooked but without the slightest browning. And finally, it has to be cooled down for a day so that the inside moisture distributes evenly throughout the cookie before it is consumed. In other words, lots of attention and precision must be given to the whole process, just like any wonderful complicated pastry.
When I showed the results of my cooking online in a group for expats in the USA, a lady remarked that there were so many good cooks and bakers in the group. I replied that necessity is the mother of invention, and so is nostalgia. I hope you are able to produce a successful bunch with my recipe and envelope yourself with fond memories of this cookie and growing up eating it.
I have provided an alternative it you do not possess a Kueh Bangkit mould.
Note: I tried another batch today using the baked flour straight out of the oven and once cooled down, and the end product had no noticeable difference compared to those made with 2-day old baked flour, as recommended by many Nyonya and recipes. I also made cookies with a 1¼-inch/3-cm cutter, and the recommended cooking time was fine.
Printable Copy (link) – Recipe from Edible Memories e-cookbook
60 grams/2.1 oz confectioners/icing sugar or caster sugar (very fine)
1 egg yolk, making sure as little egg white is attached
2 cans (400 ml each) coconut milk, the creamiest kind, or 800 ml fresh coconut milk
⅛ teaspoon regular salt
Red food coloring
Toothpick
Tools:
Baking or Parchment paper, not wax paper (optional)
Baking tray, large
Pastry brush, small (optional)
Kueh Bangkit mould or 1¼-inch/3-cm cookie cutters
Step 1 (can be made in advance): Turn the oven on to 300F/ 150C with the rack in the middle shelf. Pour the flour into a baking container or aluminium foil shaped like a bowl on a tray (for easy cooling later). Wipe the pandan leaves clean, cut into 2-inch/ 5-cm pieces, and hide them in the flour with equal spacing. Place flour into the oven and bake for 1 hour 30 minutes.
Alternative: fry this in a dry wok on medium-low heat for at least 45 minutes, stirring very gently (or the flour will fly everywhere) until the pandan leaves are dry and slightly brown.
Meanwhile, place the coconut milk into the coldest part of the fridge.
Step 2: Once baked, remove the flour from the oven. If it is to be used immediately, remove the foil onto a plate or pour the flour onto a cooler pan. Remove the pandan leaves carefully trying not to break the dried leaves. Allow to cool for around 30 minutes or more to room temperature. If reserving for another time, cover it with some plastic film once cooled. Sift the flour to measure 200 grams in a bowl, and the rest into a smaller bowl (around 2 tablespoons worth) – be careful not to pass pieces of dried pandan leaf through it.
Step 3: Remove the fresh coconut milk or 1 can from the fridge – the cream should have solidified slightly on the surface. Gently scoop the cream, while avoiding the separated water, to measure 100 grams worth – open the other can if more is needed. Add the salt and stir well. Set aside. Return the rest to the fridge to be chilled if more is needed.
Step 4: In a mixing bowl, add the sugar, and make a well in the middle. In the middle, add 3 tablespoons coconut cream and the egg yolk. Using a large whisk or hand mixer, gently beat this mixture for around 3 minutes until the yolk is pale in color and the mixture is completely smooth and it does not feel granular to touch (to make sure that the sugar is completely dissolved especially if using caster sugar).
Step 5: (will take around 30 minutes): Add the flour in 3-tablespoons increments to the sugar-egg mixture and mix well using a spatula. Add more flour until the mixture is quite stiff. At this point, add 1 tablespoon coconut cream and mix with the spatula, breaking up the dough. Add more flour and mix with your hands as you rub the dough pieces with your fingers. Continue adding the cream until 50% of it is used and all the flour has been added. You should have a very dry crumbly mixture.
Continue to add the coconut cream by ½-tablespoon increments by dripping it evenly over the dough. Use your fingers to break the larger dough pieces when mixing it. Continue to add the cream (not all used) until the dough barely comes together when gathering a handful into a ball – it should still crumble when pressure is applied. Cover with plastic film or moist kitchen towel.
Step 6: Turn the oven on to 300F/ 150C with the rack in the middle shelf. Place a baking/parchment paper big enough on a large baking tray – optional.
Step 7: Using a small pastry brush, dip it in the reserved excess flour and dust the mold indentations well. Shake off any excess but do not tap it on the countertop. Grab a small palmful of dough and squeeze hard to make it come together. Push the dough into the mold pattern making sure that it covers the whole indentation by pushing the dough quite firmly and evenly, with excess over the sides and mould top level (the dough should be a bit crumbly and fall apart easily – don’t panic).
When all the patterns in the mould are filled this way, use a butter knife to slide down the mould to shave off any excess. Turn the mould over and tap out the cookies on one end of the tray – you may have to turn the mould on the other end to tap out some stubborn ones. Repeat the process by dusting the moulds first. Arrange the cookies on the tray and use the brush to brush aside any fine bits of dough in between the cookies to a corner – remove with a spoon. If the dough is sticking to the mould, use a skewer or toothpick to clean the indentations before making the next batch of cookies.
Alternative: Roll or press down with hand on dough in small batches into ½-inch/ 1-cm thickness – if it is too crumbly, add a bit more coconut cream until it holds together more. Use the cookie cutters to cut the dough and transfer to the tray. Or you can push the original recipe dough into the cutter sitting on the tray to the above thickness.
Step 8: When the oven is hot enough, place the cookies in the middle rack with equal spacing from the oven walls. Set the timer to 15 minutes. At the halfway mark, rotate the pan so that the back of the tray is now in the front. The cookies should be colorless and as white as possible.
Step 10: After 15 minutes, turn the oven off and leave the cookies to cool down completely inside the oven. When cool, remove from the oven. Using the red food dye, dip the broader end of the toothpick into the dye and place a dot on the cookie, preferably the eye or the center.
Once cooled, place them in a storage container but do not close the lid tight for a day. They are best eaten the following day and after.
The hardcopy and e-book of The Baba Nyonya Peranakans book (1st image) and Edible Memories e-cookbook (2nd image) are available – more information on the Homepage.
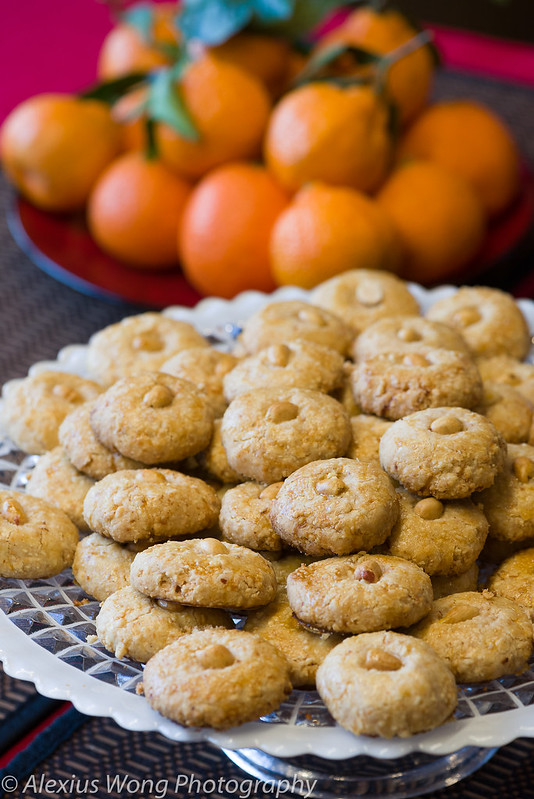
After cooking for around a week, my guests have just left my Lunar New Year Open House. It was the perfect opportunity for me to prepare some of my grandmother’s Nyonya dishes, a treat for my guests over the last few years. This year, I decided to make New Year cookies as dessert, and I started preparations a bit earlier for that. With three attempts to make the special powdery cookies, Kueh Bangkit, resulting in dissatisfaction and disappointment, I resorted to Peanut Cookies, a favorite of mine back when I was growing up in Malaysia. These are very delicate flakey bites with the rich nutty flavor in each crumb. A recent online comment by a reader reminded me of how my grandmother made these with pork lard which gave these sweet bites an added unctuousness that I still recall with great nostalgia.
With success under my belt, here is the simple and tasty recipe, adapted from the Rasa Malaysia website (see page).
Recipe from Edible Memories e-cookbook
Makes around 50 cookies.
Ingredients:
4 cups/950 ml (540 gm) roasted whole peanuts (or oven roast peeled raw peanuts at 300 F (150C) until fragrant and lightly brown), plus extra pieces for decoration
1 cup/240 ml confectionary or icing sugar
1 cup/240 ml peanut oil or lard
2 cups/475 ml all-purpose flour
2 tablespoons shortening or cold butter (only if using peanut oil, not pork lard)
1 egg yolk, beaten slightly with 1 tsp water for egg wash
Method:
Chop peanuts in food chopper until very fine and loose and when the mixture starts to become slightly sticky – do not over-chop them.
Mix the ground peanut, sugar, and flour together until well combined. Cut the shortening into mixture until fine bits. Slowly add the peanut oil and mix well, until the mixture begins to come together – stop adding the oil at this point.
Shape into small balls and place on baking tray lined with parchment paper – do not flatten. Use a toothpaste cap to make the circular indentation by pressing and rotating the cap to lightly flatten the cookie. Or you can press down a peanut half into the middle of the dough.
Brush the sides below the indentation or around the peanut with the egg wash.
Bake at 350 degrees F (180 degrees C) on middle rack for 20 minutes or until brown – check and watch out for burning after 15 minutes and rotate baking tray position if needed be. Check around the bottom of cookie for burning and remove if you smell burning. Remove from oven, take the parchment paper with the cookies off pan, and let cool. When cool, store in airtight container.
The hardcopy and e-book of The Baba Nyonya Peranakans book (1st image) and Edible Memories e-cookbook (2nd image) are available – more information on the Homepage.
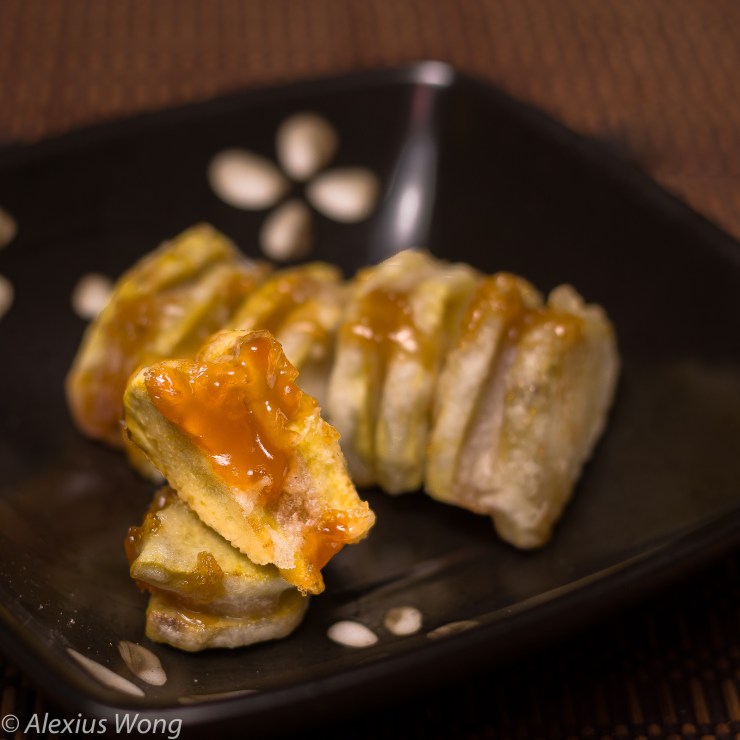
In the West, they enjoy Smores, a sandwich of sweet crackers with a gooey filling of melted marshmallow and chocolate. For the Peranakans, we enjoy another wonderful molten sandwich concoction after the Chinese New Year to finish off the Kueh Bakul that was prepared a few weeks before as an offering for a religious day.
Shortly after the Winter Solstice, a ceremony called the Kitchen God Send-Off (Sembahyang Datok Dapur) is held in which the Kitchen God (Hokkien: ThéChu Kong) goes on his annual trip to heaven to report the household year’s happenings to the heavenly realm. One week before the Lunar New Year (celebrated around the end of January or in February), offerings of three cups of tea, a pair of lighted candles, kueh bakul, and prayers are made along with the sound of firecrackers to send him off to the heavens, hopefully with little news—or preferably no—news to report (photo).
In this recipe, we can see how the Peranakans adapted a Chinese ingredient by pairing it with elements from their new Southeast Asian homeland. Kueh bakul in Baba Melayu, the Peranakan vernacular, means “cake in a basket” since banana leaves are shaped into molds for the paste. Known as neen koh in Cantonese and ti kueh in Hokkien, this cake is made just before the Lunar New Year celebrations, thus its Chinese name translates to “New Year cake.”
The Peranakans took this Chinese sticky sweet concoction and paired it with tubers common to Southeast Asia, resulting in a dessert that is totally different in character and texture. Make sure not to cut the root slices too thick, or else the “sandwich” will be too large.
You can find this sweet paste in most Asian stores around the Lunar New Year celebration. However, look for those made in Malaysia since they are firmer and sweeter than the softer versions made in China.
I prefer eating these sweet treats piping hot or just after they have cooled down for a minute while the soft, sticky, toffee-like kueh bakul filling coats the starchy root slices like caramel sauce. The crispy batter coating makes the perfect textural contrast to the melting kueh bakul and the firmer yam and taro slices. Growing up in Malaysia, I couldn’t wait for this sweet paste to be fried or steamed with fresh coconut, served right after the Chinese New Year when these treats were usually enjoyed. If the treats had not been cooked at home, my parents would seek out a roadside vendor selling them along with another treat, fried battered banana—both were heavenly snacks for us children. If you cannot find yams, you can use sweet potatoes.
200 grams (7 ounces) yam, peeled and cut into ½-centimeter (¼-inch-thick) half rounds
200 grams (7 ounces) taro, peeled and cut into ½-centimeter (¼-inch-thick) half rounds
200 grams (7 ounces) rice flour
½ teaspoon salt
2 cups vegetable oil
Refrigerate the kueh bakul for at least 2 hours before cutting it so it hardens slightly. Cut pieces that are slightly smaller than the width of the yam and taro slices. After cutting, sandwich the kueh bakul pieces with yam on one side and taro on the other. The root slices have to cover the slice of kueh bakul, but the sides do not have to be perfectly aligned.
In a bowl, mix enough water into the rice flour to make a very thick batter, like condensed milk. Add the salt and mix well.
Heat a saucepan with the oil on medium-high heat until hot. Using a pair of wooden chopsticks, dip the sandwich into the batter and coat it well. Gently lower the sandwich into the hot oil, and let it fry without moving it around, even if it sticks to the bottom—it will unstick after a minute. Fry until golden brown and a bit of the filling is oozing out. The yam and taro slices should be completely cooked.
Remove and drain on paper towels. Serve hot or room temperature.
The hardcopy and e-book of The Baba Nyonya Peranakans book (1st image) and Edible Memories e-cookbook (2nd image) are available – more information on the Homepage.
Happy Chinese or Lunar New Year of the Pig to everyone. I hope you managed to start this new year with a fantastic and scrumptious celebration. In my household, there would be weeks’ worth or preparation and cooking for this festive event, with lots of dishes, snacks, and condiments made in advance in anticipation for the big event. Kueh Pai Tee is one of those that we looked forward to with hungry stomachs.
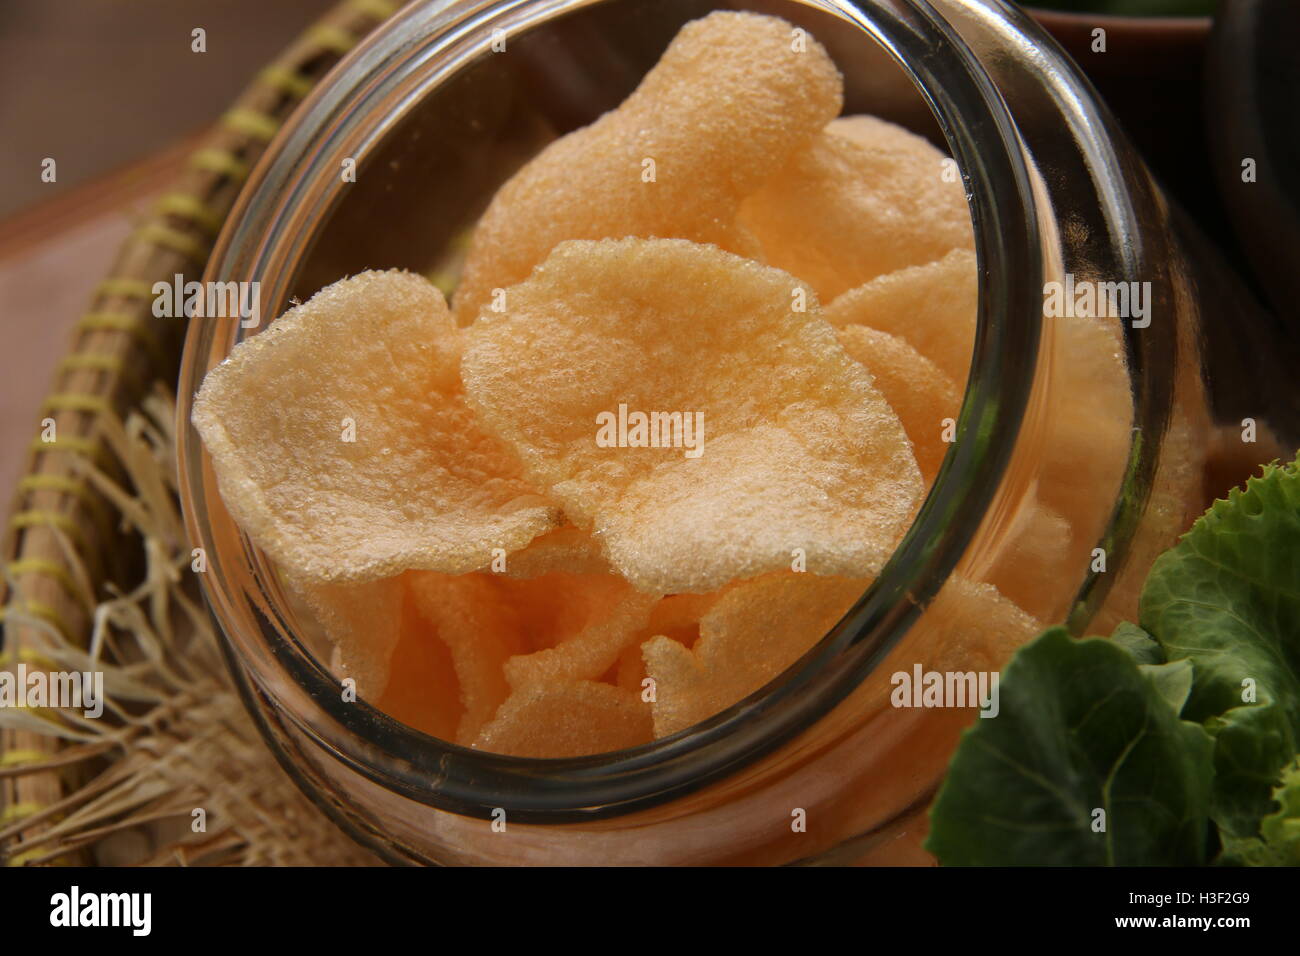
In the weeks leading up to the New Year, Nyonya ladies would get together, some having traveled from afar, in order to work communally as they prepared for the festivities. Many dishes were made ahead of time due to the lengthy and labor-intensive nature of certain dishes. The main staple, Nyonya pickles, also known as achar ahwak or achar chili melaka, would definitely be made in advance. I remember seeing trays of sliced cucumbers, chilis, and green papaya shreds lying out in the sun as they dried in preparation for the pickling process. Beside making the pickles, most of the time would also be spent making special cakes, pastries, and desserts for the celebration: pineapple tarts, dodol, kueh bakul,kueh bangkit, kueh kapit (love letters), tapeh pulut, pulut tekan (an uncustomary family tradition), and sri kaya. The tapeh pulut was also made in advance since the glutinous rice needed several days to ferment in order to produce the boozy liquid that both adults and kids enjoyed very much; this was the only time when no prohibitions were in place for children to consume this alcoholic drink. Keropok, fish or shrimp crackers (photo), would also be made in advance since the cracker chips had to be dried in the sun for a couple of days before puffing up miraculously when fried in hot oil.
The English name of this dish, or Kueh Pai Tee in the Peranakan vernacular, comes from the shape of the shells themselves as you may have figured it out already. While growing up, we ate it only occasionally, and it is one of the rare dishes that was classified as a true appetizer. I remember that they were only served on special occasions or celebrations like birthdays and Chinese New Year. However, these days, my family serves it regularly for dinner since we are so fond of it.
One reason why this dish is so well-liked is because of its novelty and taste. The juxtaposition of the crunchy shell with the softer fragrant filling makes it the perfect match in the culinary world. True appetizers in Nyonya cuisine are rare, and their being served on special occasions adds to its charm and exquisiteness.
As for the taste, it is an explosion of rich flavors and textures: a light crispy shell holding a soft and moist jicama (sengkuang) filling cooked with fragrant five-spice powder, along with shrimp, crabmeat, fried shallots, coriander leaves, and topped with the spicy and sour chili cuka sauce. The thought of enjoying these stuffed shells brings me back to the days when large meals were served during festivities, and all the relatives and family friends would crowd around the table to get their hands on these small tasty bites before they ran out. Looking at their expressions and hearing their moans were indicative of their enjoyment brought about by a cornucopia of irresistible flavors and textures. This appetizer is truly scrumptious as it conjures up in a Peranakan’s mind a festive and joyous occasion with each savory bite.
You will need a brass tee mold with deep grooves on the side to make the shells. If you cannot find jicama or yam bean, Asian white radish is a good substitute. When made, these pastries are addictive and it will be hard to stop eating them, so make sure you have more than enough for each guest (at least three or four per person).
Kueh Pai Tee/Top Hats
Recipe from The Baba Nyonya Peranakans book
Serves 10 to 15
Shells total time: 1 hour 30 minutes
Filling total time: 1 hour 15 minutes
For the shells (makes 30 to 35):
4 tablespoons rice flour
2 tablespoons all-purpose flour
1 egg, beaten
¼ teaspoon salt
¼ cup plus 2 tablespoons water
Pai Tee mold
Vegetable oil
For the stuffing:
450 grams (1 pound) sengkuang (jicama/yam bean), peeled and grated into ½-centimeter- (¼-inch-) wideshreds (substitute – Asian white radish)
225 grams (8 ounces) chicken breast or pork, finely minced
115 grams (4 ounces) shrimp, peeled and chopped fairly finely
¼ teaspoon five-spice powder
¼ teaspoon white pepper
2 tablespoons thin soy sauce
¾ cup water
Pinch salt
For the garnish:
2 eggs
Salt
1 tablespoon vegetable oil
Green leaf or Boston/Bib lettuce, torn into small pieces
½ cup crabmeat, cooked and shredded, from fresh crabs or precooked
Chili cuka sauce (recipe below)
½ cup fresh cilantro (coriander) leaves
¼ cup fried shallot rings
To make the shells:
Mix together the rice flour and all-purpose flour, egg, and salt. Add the water little by little until the batter is very runny, like evaporated (not condensed) milk. It should pour from a spoon in an unbroken stream. You may have to adjust the amount of water to achieve this consistency.
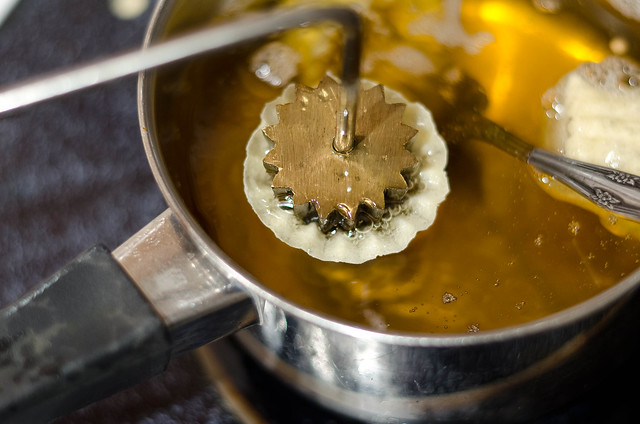
Heat the tee mold in a pot of enough hot oil to submerge the mold on medium heat for 3 minutes. Remove from the oil, wipe the bottom of the mold clean of oil, then dip the mold into the batter, all the way to the top of the ridges to get a curved edge when frying. Then place the mold back into the oil to deep-fry on medium heat until golden brown. Lift the mold slightly out of the oil to allow the dough to make a “brim.” Do not allow the bottom of the mold to touch the bottom of the pan for 30 seconds so that it will set partially. (Three shells can be fried at the same time by loosening the shells after a minute and submerging them in the oil with forks and spoons.
Remove and drain the shells on paper towels, and store in an airtight container.
To make the filling:
Squeeze the shredded jicama in cheesecloth until very dry. In a pot on medium-high heat, heat the oil and stir-fry the garlic until lightly brown, 1 minute. Add the bean sauce and stir for 1 minute. Add the chicken and cook, stirring to break it up into fine pieces, until there is no visible pink. Add the jicama, shrimp, five-spice powder, white pepper, and 2 tablespoons soy sauce. (If using Asian white radish, add 1½ tablespoons of sugar).
Add the water, lower the heat to medium-low, cover but leave the lid ajar, and simmer until the jicama is soft, no longer crunchy, and quite dry, about 15 minutes. Taste and adjust the seasoning with salt—it should taste well seasoned. Remove and let cool.
For the garnish:
Break the eggs into a bowl and beat them lightly with a pinch of salt. Place a pan on medium-low heat and heat the oil. Wipe the pan with a paper towel. Pour enough egg into the pan to make a thin pancake. When the sides curl up, pick the pancake up and flip it to cook for 10 seconds. Remove and place on a plate. Cover with plastic wrap. Repeat with the rest of the egg mixture, wiping the pan with the oiled paper between pancakes.
When the pancakes are cool, roll them up, slice first into four long and wide strips, then again into narrow strips.
To serve:
Fill the shells with pieces of lettuce followed by the jicama filling. Garnish with slices of egg pancake, crabmeat, chili cuka sauce, cilantro, and the crispy fried shallot rings, in that order. This has to be eaten immediately, otherwise the shell will get soft and soggy.
Chili Cuka
10 Finger Hot red chile peppers, stemmed, or 4 tablespoons paste/sambal oelek
6 garlic cloves, peeled and crushed
2.5 centimeter (1-inch) knob young ginger root, peeled
1 tablespoon sugar
Juice from 15 limau kasturi or 3 large limes, (15 tablespoons juice)
1 teaspoon salt
In a food processor, purée the chile peppers to a paste. Measure 4 tablespoons of paste and save any extra for a future use. Return the 4 tablespoons of paste to the processor and add the garlic and ginger. Purée to a fine paste. Stir in the sugar and lime juice. Add the salt to taste. Refrigerate in a bottle if not consumed immediately.
The hardcopy and e-book of The Baba Nyonya Peranakans book (1st image) and Edible Memories e-cookbook (2nd image) are available – more information on the Homepage.


